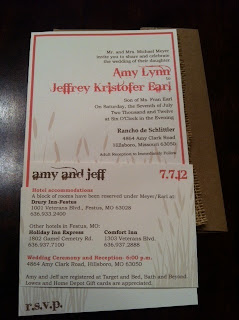
After looking at hundreds of different invitation options and receiving so many this year (13 weddings plus our own to attend) , I couldn't relate to any. None of them portrayed our wedding the way I wanted it to. So, being the control freak that I am, I decided to make them myself. I figured, how hard could this really be? People make them all the time. Wow, did I have some interesting moments during the invitation process.
First I looked online at different card stock options and found this site called
cutcardstock.com. They were very reasonably priced and had the colors and sizes I thought I needed. They shipped them to me extremely fast and arrived in perfect condition.
I ordered:
- Pop-tones "Whipped Cream" size A-7, 5 1/8" x 7"
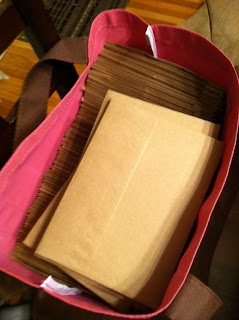
- Brown Bag Kraft square flap A-7 envelopes
- Pop-tones "Whipped Cream" size A-1, 3.5" x 4 7/8"
- Pop-tones "Whipped Cream" size A-2, 4.25" x 5.5"
- Brown Bag Kraft square flap A-2 envelopes
I used A-7 for the actual invitation, A-1 for hotel accommodations and response cards (a minor mistake) and A-2 for the thank you cards.
Wanting them to have the diy rustic look I came to terms with printing them on my computer printer. I designed my invitation, accommodation card and the mad lib response card and decided to start printing some. Fail. My printer would not allow me to insert random sized paper into the feeder. I called my mom freaking out and she said don't stress, bring it to our house this weekend and I'm sure one of our 3 printers will work. Success! I began printing away at her house until I ran out of ink...not once, but twice. Also the border was a cm off when I printed them so I had to trim 220 invitations so the borders were even on the paper. I was printing invitations, response and accommodation cards all the way up until Jeff said, Amy if we don't leave now we won't be able to get our dog from the kennel, it's a 2 hour drive.
When I returned home I was feeling pretty good, minor printing and trimming issues were resolved, I was happy with the look, next steps were to stuff, address and stamp.
I decided I wanted to put burlap squares behind each invitation to give it that rustic country feel. So I spent a few nights cutting 220 squares of burlap.
Random fact: Dogs love the smell of burlap! I can't tell you how many times I had to swipe a piece of burlap from Tucker. Finally I gave up and let him play with a piece. I wanted to wrap a piece of jute around the pieces, but it was too bulky in the brown bag envelope.
In the few days that I was cutting all those burlap squares I decided I should go to the post office to make sure it was up to par. He made me remove the piece of jute, which I had already figured I'd remove, but tried it anyways. I asked him for stamps for the invitations and postcard stamps. He then asked to see the post card. As he takes it from me, he puts it on his measuring board and tells me, "You are going to have to get these re-printed, they are a half an inch to short." After a breath I looked at him with tears in my eyes and said seriously? He replied with well it's either re-print them or buy envelopes to put them in. I wanted to just start crying at that point, but I held it in and said fine, I will go buy some envelopes because I am not re-printing these, I had enough issues with them. I bought the stamps for the invitations and walked out quietly cursing to myself over a half of a cm.
Once I was in the car I called my mom with another freak out moment and she was busy so I could only vent for a moment. I then decided to call our friend who's mom works at the post office to see what would happen if I put a regular stamp on them and sent them off anyways. Her mom told us that if it has a stamp on it, they normally ship it. She saw a piece of cardboard come through with a stamp on it so she figured I would be ok with my wedding response cards. Then I called a bridesmaid to discuss my frustration and she calmed me down and determined to give it a try. Isn't the post office complaining it needs more revenue? I'm trying to buy stamps to mail my 220 wedding invitations along with 220 response cards, so I will buy the regular stamps and they can make an extra $28 by having me send the 45 cent stamps on everything even if it's half an inch too short.
I hand addressed all my invitations myself, along with the return address. I only had white return address labels and I didn't like how it looked so the perfectionist in me made it match. I wish I would have bought one of those cute stamps on
Etsy.
I must admit I did have a helper, Jeff helped me stuff all the invitations and seal them with the
Scotch Scrapbookers Glue. After what felt like weeks, it was really days, we finally finished all the invitations. I was extremely pleased with them and our mail man delivered them back to us. He even stopped me and said you seem to be planning a very large party, best wishes to you both! Made my day especially after thinking I wouldn't receive any of our response cards because they were a little short. Thank you to the usps workers that allowed me to receive my response cards!


*Fonts used were Bleeding Cowboys and Bookman Old Style.


